Day_38 02. 한국어 BERT 언어모델 학습
작성일
BERT Pre-Training
1. BERT 학습하기
1.1 BERT 모델 학습
BERT 학습의 단계
- Tokenizer 만들기
- 데이터셋 확보
- Next sentence prediction (NSP)
- Masking
모델사이즈가 크기 때문에 대용량의 데이터셋이 필요
이미 있는 거 쓰지, 왜 새로 학습해야 해요?
도메인 특화 task 의 경우, 도메인 특화 된 학습 데이터만 사용하는 것이 성능이 더 좋다!
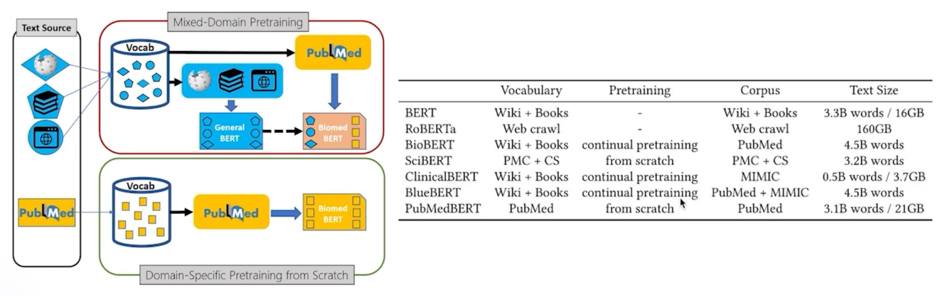
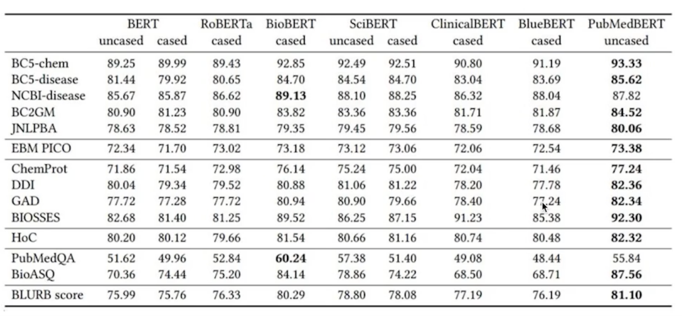
생리학 관련된 데이터를 모아서 Scrach 바닥부터 학습한 모델이 더 성능이 좋다라는 것을 얘기함
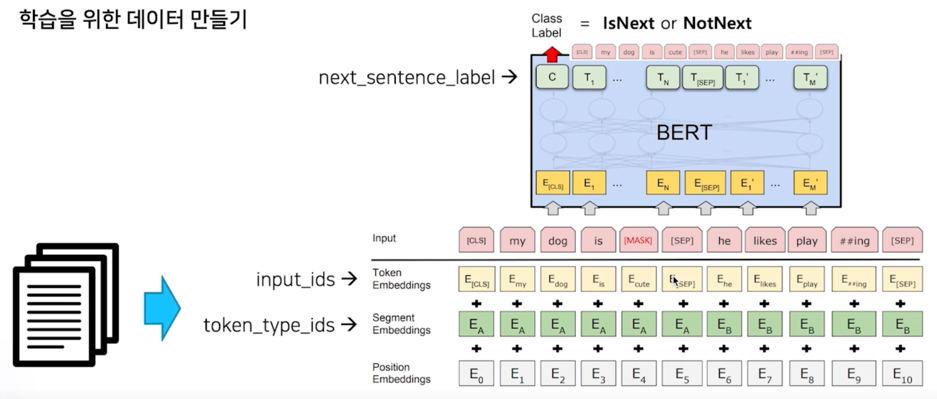
학습을 위한 데이터 만들기
현업에 들어가면 도메인에 특화된 데이터를 많이 다루게 될 것임
심지어 댓글데이터, 특허청 데이터, 법률데이터, 금융권 관련 데이터 굉장히 많을 것임
그러나 해당 도메인에 관련된 corpus 를 가지고 학습을 해야 더 좋은 성능을 낼 수 있다는 것이 증명됨
학습을 위한 데이터를 이미 가지고 있는 상태에서 이제는 이 데이터를 데이터셋의 형태로 만들어야 함
모델을 학습할 때 하나는 데이터셋, 하나는 데이터로더
데이터셋은 모델이 학습하기 밥을 만드는 것이고 재료들 모델의 입력으로 들어가는 형태를 만들어주는게 데이터셋을 만든다고 함
데이터로더는 모델에게 어떻게 밥을 먹여주냐의 문제가 됨
BERT 입자에서 모델의 입력으로 들어가는 밥은 어떻게 만드느냐?
당연히 input_ids 토큰단위의 vocab id 로 전달해야 하고 그리고 vocab id 의 token_type segment A 다 segment B 다 라는
정보가 있어야하고 position encoding 이런 다양한 정보들이 들어가야 함
기존의 corpus 를 모델이 학습할 수 있는 형태로 만들어야 함
그 뿐만 아니라 여기에는 Next Sentence Prediction 도 들어가있음
이렇게 데이터셋을 만들고나면 그 다음은 BERT 에게 어떻게 밥을 먹여줄것이냐?
당연히 Masking 이 들어가야 함
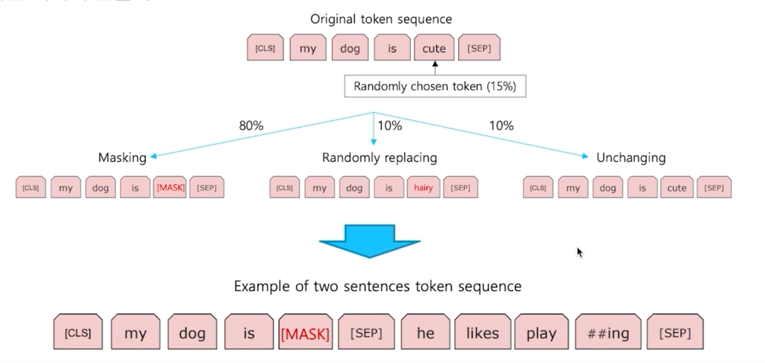
만들어진 데이터셋에서 중간중간에 Masking 작업을 통한 데이터를 직접적으로 밥을 먹여주는 것임
실습
BERT [MASK] token attack
가장 중요한 건 학습데이터에 개인정보나 저작권 이슈가 해결된 데이터를 사용해야 함!!
BERT 모델은 [MASK] 토큰을 잘 예측하기 위해 학습함
그래서 [MASK] 토큰을 예측하는 task 를 통해 개인정보를 획득할 수 있음
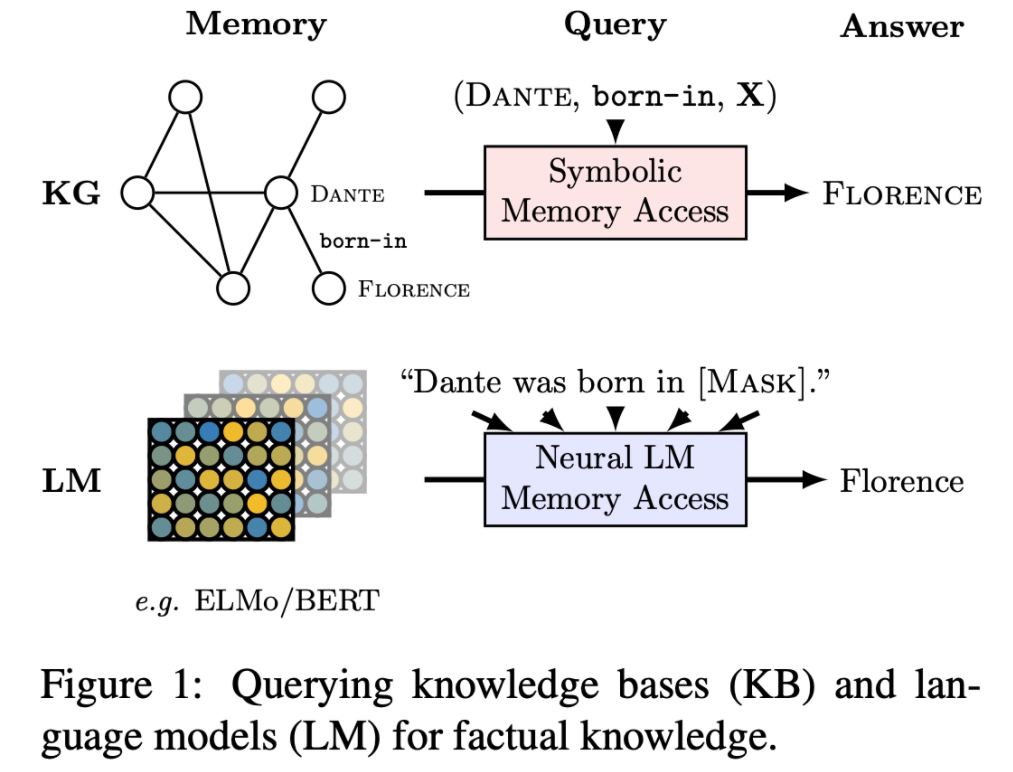
[MASK] 토큰의 예측을 통해 지식그래프를 확장하는 그런 논문도 공개됨
그리고 실제로 BERT 를 통해 지식그래프가 확장될 수 있다 혹은 학습에 사용됐던 데이터가 들어날 수 있다
이게 논문에서 소개되고 있음
예를 봐보자
from transformers import BertForMaskedLM, AutoTokenizer

# Store the model we want to use
MODEL_NAME = "bert-base-multilingual-cased"

# We need to create the model and tokenizer
model = BertForMaskedLM.from_pretrained(MODEL_NAME)
tokenizer = AutoTokenizer.from_pretrained(MODEL_NAME)
반드시 tokenizer 를 돌려볼 것!!
print(tokenizer('이순신은 조선 중기의 무신이다.'))

나의 load 한 토크나이저가 한국어를 올바르게 분석을 해내는지 가끔 이상하게 load 된 토크나이저는 전부다 [UNK] 로 나오는 경우도 있음
from transformers import pipeline

nlp_fill = pipeline('fill-mask', top_k=5, model=model, tokenizer=tokenizer)
nlp_fill('Martin is living in [MASK].')
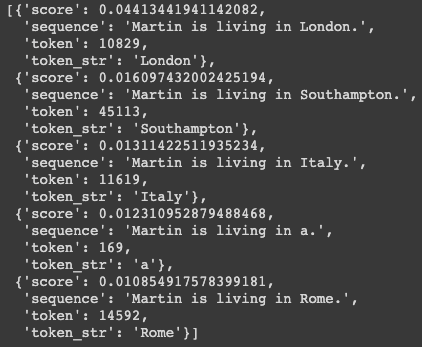
pipeline 을 사용하면 ‘fill-mask’ 로 [MASK] 토큰을 채울 수 있음
그러면 어떤 지역에 사는지 나옴
정말 유명한 사람으로 테스트를 해보자.
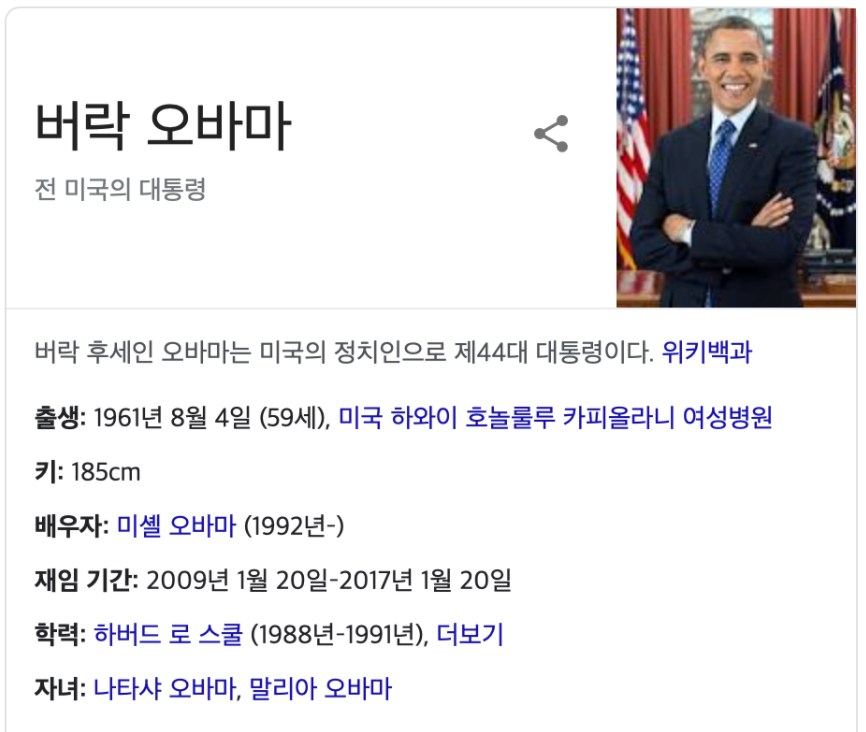
nlp_fill('Barack Hussein Obama graduated from [MASK] University.')
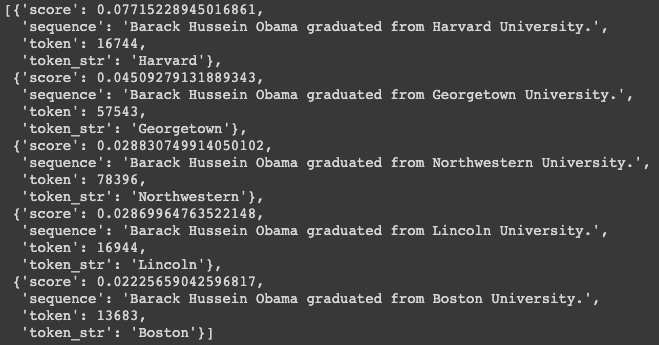
모델이 바로 Harvard 를 맞춤
오바마가 원하든 원치 않든 오바마는 Harvard University 를 졸업했다는 정보가 들어있어서 개인정보가 유출될 수 있음
또 다른 예로
nlp_fill('Obama was [MASK] of the United States.')
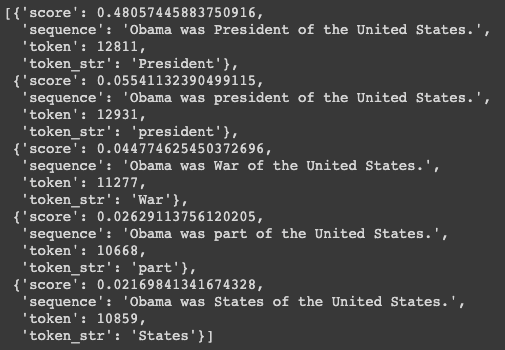
President 를 맞춰버림
어떻게? 학습데이터에 이미 오바마는 President 라는 것과 연결성이 굉장히 많을거니까
이렇게 [MASK] 를 이용해서 직업에 대한 것도 나올 수 있고
nlp_fill('Obama was born in [MASK], Hawaii.')
하와이의 많은 지명이 있을텐데 Honolulu 를 맞춰버림
이런 예시가 단적인 예시가 될 수 있겠지만 언어 모델을 학습할 때 반드시 개인정보가 다 Masking 처리가 되거나 개인정보가 없는 데이터로 학습을 해야한다는 사실을 명심!!
실습
한국어 BERT 모델 학습
실습을 위해 아주 작은 wiki 코퍼스를 사용하겠음
!mkdir my_data

!curl -c ./cookie -s -L "https://drive.google.com/uc?export=download&id=1zib1GI8Q5wV08TgYBa2GagqNh4jyfXZz" > /dev/null
!curl -Lb ./cookie "https://drive.google.com/uc?export=download&confirm=`awk '/download/ {print $NF}' ./cookie`&id=1zib1GI8Q5wV08TgYBa2GagqNh4jyfXZz" -o my_data/wiki_20190620_small.txt
한국어 wiki 전체 코퍼스도 공유함
!curl -c ./cookie -s -L "https://drive.google.com/uc?export=download&id=1_F5fziHjUM-jKr5Pwcx1we6g_J2o70kZ" > /dev/null
!curl -Lb ./cookie "https://drive.google.com/uc?export=download&confirm=`awk '/download/ {print $NF}' ./cookie`&id=1_F5fziHjUM-jKr5Pwcx1we6g_J2o70kZ" -o my_data/wiki_20190620.txt
개인의 한국어 BERT 모델을 만들고 싶다면 이 데이터를 이용해서 학습하면 됨
Tokenizer 만들기
!mkdir wordPieceTokenizer
from tokenizers import BertWordPieceTokenizer

# Initialize an empty tokenizer
wp_tokenizer = BertWordPieceTokenizer(
    clean_text=True,   # ["이순신", "##은", " ", "조선"] ->  ["이순신", "##은", "조선"]
    # if char == " " or char == "\t" or char == "\n" or char == "\r":
    handle_chinese_chars=True,  # 한자는 모두 char 단위로 쪼게버립니다.
    strip_accents=False,    # True: [YehHamza] -> [Yep, Hamza]
    lowercase=False,    # Hello -> hello
)

# And then train
wp_tokenizer.train(
    files="my_data/wiki_20190620_small.txt",
    vocab_size=20000,   # vocab size 를 지정해줄 수 있습니다.
    min_frequency=2,
    show_progress=True,
    special_tokens=["[PAD]", "[UNK]", "[CLS]", "[SEP]", "[MASK]"],
    wordpieces_prefix="##"
)

# Save the files
wp_tokenizer.save_model("wordPieceTokenizer", "my_tokenizer")
print(wp_tokenizer.get_vocab_size())

text = "이순신은 조선 중기의 무신이다."
tokenized_text = wp_tokenizer.encode(text)
print(tokenized_text.tokens)
print(tokenized_text.ids)

BERT 학습
먼저 BERT 의 껍데기를 만들어야 함
BERT 껍데기를 만들어 놓고 여기에 데이터셋을 데이터로더를 통해 계속 먹여주면서 이 껍데기의 weight 가 조절이 되면서
학습이 됨
from transformers import BertConfig, BertForPreTraining, BertTokenizerFast

tokenizer = BertTokenizerFast(
    vocab_file='/content/wordPieceTokenizer/my_tokenizer-vocab.txt',
    max_len=128,
    do_lower_case=False,
    )
우선은 위에서 생성한 tokenizer 를 불러옴
print(tokenizer.tokenize("뷁은 [MASK] 조선 중기의 무신이다."))

[MASK] 토큰이 스페셜토큰으로 등록되어 있지 않아서 다 쪼개짐
그래서 special token 으로 추가해주자
tokenizer.add_special_tokens({'mask_token':'[MASK]'})
print(tokenizer.tokenize("이순신은 [MASK] 중기의 무신이다."))

본격적으로 BERT 를 학습하기 위해 BERT 껍데기를 만들어 줘야 함
그런데 이 껍데기를 위한 다양한 조건들이 있음
그걸 configuration 을 통해서 조절할 수 있음
from transformers import BertConfig, BertForPreTraining

config = BertConfig(    # https://huggingface.co/transformers/model_doc/bert.html#bertconfig
    vocab_size=20000,
    # hidden_size=512,
    # num_hidden_layers=12,    # layer num
    # num_attention_heads=8,    # transformer attention head number
    # intermediate_size=3072,   # transformer 내에 있는 feed-forward network의 dimension size
    # hidden_act="gelu",
    # hidden_dropout_prob=0.1,
    # attention_probs_dropout_prob=0.1,
    max_position_embeddings=128,    # embedding size 최대 몇 token까지 input으로 사용할 것인지 지정
    # type_vocab_size=2,    # token type ids의 범위 (BERT는 segmentA, segmentB로 2종류)
    # pad_token_id=0,
    # position_embedding_type="absolute"
)

model = BertForPreTraining(config=config)
model.num_parameters()

BertConfig 라는 게 있고 자세한건 여기를 참고하시면 config 를 세세하게 조절할 수 있고 config 의 값들이 어떤 역할을 하는지도 볼 수 있음
- BertConfig 의 default vocab_size 는 영어쪽에 맞춰져 있음 그래서 내가 만든 tokenzier 는 20000 vocab 으로 만들어진 tokenizer 이므로 반드시 수정해야함
- hidden_size 는 Transformer 내부에 있는 hidden vector size 를 의미
- num_hidden_layers 는 hidden_layer 를 몇개를 쌓을것이냐
- BERT 같은 pre-training 된 모델을 쓰되 좀 더 빠른걸 원한다 그러면 num_hidden_layers 수를 줄여줬음 (3이나 6정도) 이래도 성능차이가 크게 나지 않음
- 서비스 관점에서 정확도가 3% 올랐다 이런거는 크게 의미 없음
- 만약 빠른속도로 동작하는게 필요하다면 layer 수 줄여주고 hidden_size 줄여주고 이런 요소들을 적용해 볼 수 있음
- 반대로 layer 를 64로 늘려서 더 큰 모델을 만들수도 있음
- attention_head 는 Transformer 가 multi-head self-attention 으로 되어있으니 그 head 개수를 조절할 수 있음
- intermediate_size 는 transformer 내에 있는 feed-forward network 의 dimension size 를 정의할 수 있음
- 만약 모델의 사이즈를 줄이고 싶다면 이 숫자를 낮출 수 있음
- hidden_act 는 ‘gelu’ 로 만들어져있음
- hidden_dropout_prob, attention_probs_dropout_prob 정보도 넣을 수 있음
- max_position_embeddings 이건 굉장히 중요한 요소임
- 실습 환경을 빠르게하기 위해 128로 줄여두었음
- 나의 모델이 최대 어떤 사이즈까지 input 토큰을 받겠는가의 사이즈를 정의해 주는 것
- 기존의 BERT default 값은 512로 정의가 되어있음
- 기존의 BERT 가 512개의 토큰을 받는 큰 모델이었다면 128개의 사이즈로 받는 더 좁은 모데을 만들게 됨
- 본인의 task 에 따라서 임베딩 사이즈는 조절하면 됨
- type_vocab_size 는 type_id 를 의미하고 BERT 같은 경우 segmentA 와 segmentB 로 이루어졌기 때문에 2로 정의
- pad_token_id 는 [PAD] 토큰이 어떤 id 값을 가지는지
- position_embedding_type 은 “absolute” input 토큰에 따라 절대값으로 positional encoding 을 하겠다라는 의미
이렇게 configuration 을 정의를 하게 되면 모델의 Transformers 에서 아예 모델 타입을 제공해주고 있음
모델 타입의 이름이 BertForPreTraining 임
우리는 이렇게 정의된 config 를 이용해서 모델만 껍데기를 콜하면 내가 학습할 수 있는 모델 껍데기가 만들어진 것임
파라미터 개수가 굉장히 많음
이제 데이터셋을 만들어줘야함
from transformers import DataCollatorForLanguageModeling

import torch
from torch.utils.data.dataset import Dataset
from transformers.tokenization_utils import PreTrainedTokenizer
from typing import Dict, List, Optional
import os
import json
import os
import pickle
import random
import time
import warnings

from filelock import FileLock

from transformers.utils import logging

logger = logging.get_logger(__name__)
데이터셋을 만드는 부분이 이번 pre-training 의 핵심임
large corpus 를 어떻게 데이터셋으로 변환을 해서 모델에 넣겠는가를 아래 코드를 보면서 이해하면 빠르게 될 것임
데이터셋을 구성할 때는 input_idx, token_type_ids, Next Sentence Prediction label 을 정의해줘야 모델이 학습할 수 있음
아래 코드는 github 공식 코드를 가져옴
class TextDatasetForNextSentencePrediction(Dataset):
    """
    This will be superseded by a framework-agnostic approach soon.
    """

    def __init__(
        self,
        tokenizer: PreTrainedTokenizer,
        file_path: str,
        block_size: int,
        overwrite_cache=False,
        short_seq_probability=0.1,
        nsp_probability=0.5,
    ):
        # 여기 부분은 학습 데이터를 caching하는 부분입니다 :-)
        assert os.path.isfile(file_path), f"Input file path {file_path} not found"

        self.block_size = block_size - tokenizer.num_special_tokens_to_add(pair=True)
        self.short_seq_probability = short_seq_probability
        self.nsp_probability = nsp_probability

        directory, filename = os.path.split(file_path)
        cached_features_file = os.path.join(
            directory,
            "cached_nsp_{}_{}_{}".format(
                tokenizer.__class__.__name__,
                str(block_size),
                filename,
            ),
        )

        self.tokenizer = tokenizer

        lock_path = cached_features_file + ".lock"

        # Input file format:
        # (1) One sentence per line. These should ideally be actual sentences, not
        # entire paragraphs or arbitrary spans of text. (Because we use the
        # sentence boundaries for the "next sentence prediction" task).
        # (2) Blank lines between documents. Document boundaries are needed so
        # that the "next sentence prediction" task doesn't span between documents.
        #
        # Example:
        # I am very happy.
        # Here is the second sentence.
        #
        # A new document.

        with FileLock(lock_path):
            if os.path.exists(cached_features_file) and not overwrite_cache:
                start = time.time()
                with open(cached_features_file, "rb") as handle:
                    self.examples = pickle.load(handle)
                logger.info(
                    f"Loading features from cached file {cached_features_file} [took %.3f s]", time.time() - start
                )
            else:
                logger.info(f"Creating features from dataset file at {directory}")
                # 여기서부터 본격적으로 dataset을 만듭니다.
                self.documents = [[]]
                with open(file_path, encoding="utf-8") as f:
                    while True: # 일단 문장을 읽고
                        line = f.readline()
                        if not line:
                            break
                        line = line.strip()

                        # 이중 띄어쓰기가 발견된다면, 나왔던 문장들을 모아 하나의 문서로 묶어버립니다.
                        # 즉, 문단 단위로 데이터를 저장합니다.
                        if not line and len(self.documents[-1]) != 0:
                            self.documents.append([])
                        tokens = tokenizer.tokenize(line)
                        tokens = tokenizer.convert_tokens_to_ids(tokens)
                        if tokens:
                            self.documents[-1].append(tokens)
                # 이제 코퍼스 전체를 읽고, 문서 데이터를 생성했습니다! :-)
                logger.info(f"Creating examples from {len(self.documents)} documents.")
                self.examples = []
                # 본격적으로 학습을 위한 데이터로 변형시켜볼까요?
                for doc_index, document in enumerate(self.documents):
                    self.create_examples_from_document(document, doc_index) # 함수로 가봅시다.

                start = time.time()
                with open(cached_features_file, "wb") as handle:
                    pickle.dump(self.examples, handle, protocol=pickle.HIGHEST_PROTOCOL)
                logger.info(
                    "Saving features into cached file %s [took %.3f s]", cached_features_file, time.time() - start
                )

    def create_examples_from_document(self, document: List[List[int]], doc_index: int):
        """Creates examples for a single document."""
        # 문장의 앞, 뒤에 [CLS], [SEP] token이 부착되기 때문에, 내가 지정한 size에서 2 만큼 빼줍니다.
        # 예를 들어 128 token 만큼만 학습 가능한 model을 선언했다면, 학습 데이터로부터는 최대 126 token만 가져오게 됩니다.
        max_num_tokens = self.block_size - self.tokenizer.num_special_tokens_to_add(pair=True)

        # We *usually* want to fill up the entire sequence since we are padding
        # to `block_size` anyways, so short sequences are generally wasted
        # computation. However, we *sometimes*
        # (i.e., short_seq_prob == 0.1 == 10% of the time) want to use shorter
        # sequences to minimize the mismatch between pretraining and fine-tuning.
        # The `target_seq_length` is just a rough target however, whereas
        # `block_size` is a hard limit.

        # 여기가 재밌는 부분인데요!
        # 위에서 설명했듯이, 학습 데이터는 126 token(128-2)을 채워서 만들어지는게 목적입니다.
        # 하지만 나중에 BERT를 사용할 때, 126 token 이내의 짧은 문장을 테스트하는 경우도 분명 많을 것입니다 :-)
        # 그래서 short_seq_probability 만큼의 데이터에서는 2-126 사이의 random 값으로 학습 데이터를 만들게 됩니다.
        target_seq_length = max_num_tokens
        if random.random() < self.short_seq_probability:
            target_seq_length = random.randint(2, max_num_tokens)

        current_chunk = []  # a buffer stored current working segments
        current_length = 0
        i = 0

        # 데이터 구축의 단위는 document 입니다
        # 이 때, 무조건 문장_1[SEP]문장_2 이렇게 만들어지는 것이 아니라,
        # 126 token을 꽉 채울 수 있게 문장_1+문장_2[SEP]문장_3+문장_4 형태로 만들어질 수 있습니다.
        while i < len(document):
            segment = document[i]
            current_chunk.append(segment)
            current_length += len(segment)
            if i == len(document) - 1 or current_length >= target_seq_length:
                if current_chunk:
                    # `a_end` is how many segments from `current_chunk` go into the `A`
                    # (first) sentence.
                    a_end = 1
                    # 여기서 문장_1+문장_2 가 이루어졌을 때, 길이를 random하게 짤라버립니다 :-)
                    if len(current_chunk) >= 2:
                        a_end = random.randint(1, len(current_chunk) - 1)
                    tokens_a = []
                    for j in range(a_end):
                        tokens_a.extend(current_chunk[j])
                    # 이제 [SEP] 뒷 부분인 segmentB를 살펴볼까요?
                    tokens_b = []
                    # 50%의 확률로 랜덤하게 다른 문장을 선택하거나, 다음 문장을 학습데이터로 만듭니다.
                    if len(current_chunk) == 1 or random.random() < self.nsp_probability:
                        is_random_next = True
                        target_b_length = target_seq_length - len(tokens_a)

                        # This should rarely go for more than one iteration for large
                        # corpora. However, just to be careful, we try to make sure that
                        # the random document is not the same as the document
                        # we're processing.
                        for _ in range(10):
                            random_document_index = random.randint(0, len(self.documents) - 1)
                            if random_document_index != doc_index:
                                break
                        # 여기서 랜덤하게 선택합니다 :-)
                        random_document = self.documents[random_document_index]
                        random_start = random.randint(0, len(random_document) - 1)
                        for j in range(random_start, len(random_document)):
                            tokens_b.extend(random_document[j])
                            if len(tokens_b) >= target_b_length:
                                break
                        # We didn't actually use these segments so we "put them back" so
                        # they don't go to waste.
                        num_unused_segments = len(current_chunk) - a_end
                        i -= num_unused_segments
                    # Actual next
                    else:
                        is_random_next = False
                        for j in range(a_end, len(current_chunk)):
                            tokens_b.extend(current_chunk[j])

                    # 이제 126 token을 넘는다면 truncation을 해야합니다.
                    # 이 때, 126 token 이내로 들어온다면 행위를 멈추고,
                    # 만약 126 token을 넘는다면, segmentA와 segmentB에서 랜덤하게 하나씩 제거합니다.
                    def truncate_seq_pair(tokens_a, tokens_b, max_num_tokens):
                        """Truncates a pair of sequences to a maximum sequence length."""
                        while True:
                            total_length = len(tokens_a) + len(tokens_b)
                            if total_length <= max_num_tokens:
                                break
                            trunc_tokens = tokens_a if len(tokens_a) > len(tokens_b) else tokens_b
                            assert len(trunc_tokens) >= 1
                            # We want to sometimes truncate from the front and sometimes from the
                            # back to add more randomness and avoid biases.
                            if random.random() < 0.5:
                                del trunc_tokens[0]
                            else:
                                trunc_tokens.pop()

                    truncate_seq_pair(tokens_a, tokens_b, max_num_tokens)

                    assert len(tokens_a) >= 1
                    assert len(tokens_b) >= 1

                    # add special tokens
                    input_ids = self.tokenizer.build_inputs_with_special_tokens(tokens_a, tokens_b)
                    # add token type ids, 0 for sentence a, 1 for sentence b
                    token_type_ids = self.tokenizer.create_token_type_ids_from_sequences(tokens_a, tokens_b)

                    # 드디어 아래 항목에 대한 데이터셋이 만들어졌습니다! :-)
                    # 즉, segmentA[SEP]segmentB, [0, 0, .., 0, 1, 1, ..., 1], NSP 데이터가 만들어진 것입니다 :-)
                    # 그럼 다음은.. 이 데이터에 [MASK] 를 씌워야겠죠?
                    example = {
                        "input_ids": torch.tensor(input_ids, dtype=torch.long),
                        "token_type_ids": torch.tensor(token_type_ids, dtype=torch.long),
                        "next_sentence_label": torch.tensor(1 if is_random_next else 0, dtype=torch.long),
                    }

                    self.examples.append(example)

                current_chunk = []
                current_length = 0

            i += 1

    def __len__(self):
        return len(self.examples)

    def __getitem__(self, i):
        return self.examples[i]
dataset = TextDatasetForNextSentencePrediction(
    tokenizer=tokenizer,
    file_path='/content/my_data/wiki_20190620_small.txt',
    block_size=128,
    overwrite_cache=False,
    short_seq_probability=0.1,
    nsp_probability=0.5,
)

data_collator = DataCollatorForLanguageModeling(    # [MASK] 를 씌우는 것은 저희가 구현하지 않아도 됩니다! :-)
    tokenizer=tokenizer, mlm=True, mlm_probability=0.15
)
- block_size : 모델의 embedding 사이즈
- overwrite_cache : 캐시를 덮어쓸거냐
- short_seq_probability, nsp_probability 설정 가능
밥을 떠먹여 줄때는 masking 작업을 해줘야 함
이 masking 작업은 우리가 구현할 필요 없음
transformers 가 제공해줌
니가 만든 밥을 DataCollatorForLanguageModeling 에 넣으면 너희가 정의한 mlm_probability 에 맞춰서 masing 넣어줄게
for example in dataset.examples[0:1]:
    print(example)
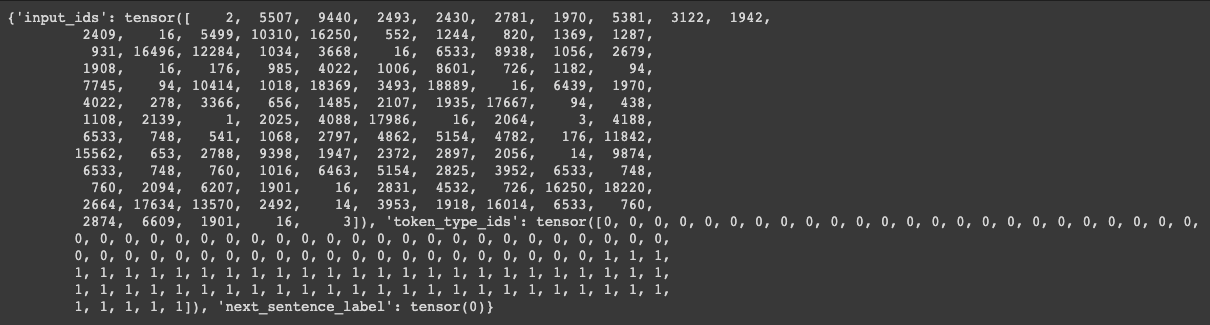
결과를 보면 2는 [CLS] 토큰이고 3은 [SEP] 토큰임
[MASK] 를 부착하는 data collator 는 어떤일을 하느냐?
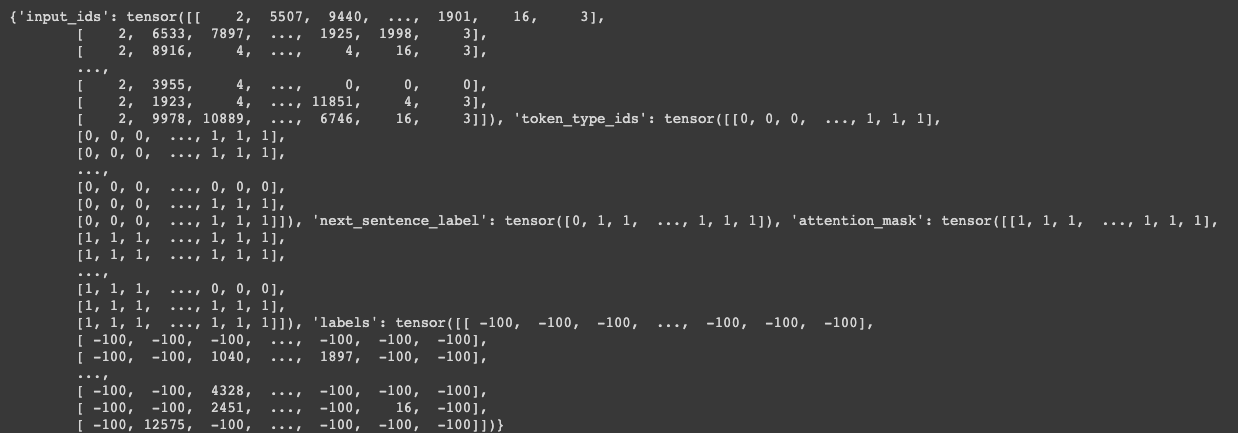
print(data_collator(dataset.examples))
dataset.examples 에 들어있는 애들이 밥임
얘네들을 data_collator 에 태우게되면
print(data_collator(dataset.examples)['input_ids'][0])
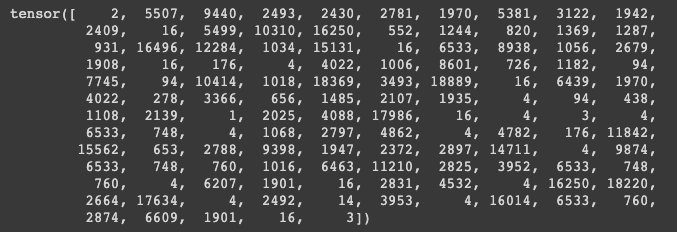
이렇게 input_ids 를 바꿔치기 함과 동시에 ‘label’ 이라는 값을 만들어줌
바꿔치기 한 대상이 [MASK] 된 애는 [MASK] 로 표현을 하고 [MASK] 할 애도 있지만 replcae 한애도 있었음
replace 를 하게되면 원래 id 가 뭔지를 알려줘야 함 그게 이 label 의 역할임
마지막 둘째줄에 16에 등장하는 토큰은 원래는 어떤 토큰이었지만 16번째 vocab 의 토큰으로 replace 가 된 것임
이런 정보들이 다 저장됨
이거를 decoding 해서 관찰을 해보자
tokenizer.decode(data_collator(dataset.examples)['input_ids'][0].tolist())

우리의 밥이 함수를 실행함으로써 masking 이 만들어 졌음
이러면 밥도 만들어졌고 데이터로더 모델에 밥을 먹여주는 규칙도 많을어짐
from transformers import Trainer, TrainingArguments

training_args = TrainingArguments(
    output_dir='model_output',
    overwrite_output_dir=True,
    num_train_epochs=10,
    per_gpu_train_batch_size=32,
    save_steps=1000,
    save_total_limit=2,
    logging_steps=100
)

trainer = Trainer(
    model=model,
    args=training_args,
    data_collator=data_collator,
    train_dataset=dataset
)
학습은 어떻게 하느냐?
지금 label 이 굉장히 많음
Mask label 도 있고 NestSentence label 도 있고 다양한 label 이 있어서 이걸 tensorflow 나 pytorch 로 구현하려면
굉장히 복잡함
그래서 transformers 가 Traniner 라는 걸 제공해주고 있음
Traniner 를 사용하면 뭐가되느냐?
BERT 모델 껍데기를 만드는데도 configuration 해줬어야 했죠
마찬가지로 TraningArguments 라는 일종의 configuration 을 만들어 놓을 거임
- output_dir : 모델이 어디에 output 될건지
- overwrite_output_dir : 새로운 모델이 모델이 학습됨에 따라 계속 덮어쓰기가 될건지
- num_train_epochs : 내가 주어진 데이터를 대상으로 몇 epoch 를 돌것인가
- per_gpu_train_batch_size : 배치사이즈
- save_steps : 스텝수에 따라서 저장을 하게 되는 1000스텝마다 저장하게 됨
- save_total_limit : 1000 스텝마다 저장하게 되면 데이터수가 엄청나게 늘어남 이걸 2로 지정해주면 마지막 2개 빼고 과거를 계속 삭제해줌
- logging_steps : log 를 몇 스텝마다 찍어줄 것인가?
Trainer 에 모델을 넣고 TrainingArguments 넣고 밥을 어떻게 떠먹여줄건지(data_collector) 와 밥은 이거다(dataset) 이
4가지만 명시하고 trainer.train() 을 하면 학습이 됨
trainer.train() # wiki 전체 데이터로 학습 시, 1 epoch에 9시간 정도 소요됩니다!!
trainer.save_model('./model_output')
특정 위치로 모델이 save 됨
BERT 학습이 끝나고 [MASK] 테스트도 가능함
[MASK] 테스트를 위해서는 pipeline 을 사용할 건데 [MASK] 테스트를 위해서 모델을 다르게 load 해줘야 함
아까 우리가 만든 모델은 BertForPreTrained 클래스였음
얘는 BertForMaskedLM 으로 만들어 줘야 함
from transformers import BertForMaskedLM, pipeline

my_model = BertForMaskedLM.from_pretrained('model_output')
BertForMaskedLM 에 아까 학습한 모델을 넣게 되면 my_model 안에 내가 학습한 모델이 load 됨
tokenizer.tokenize('이순신은 [MASK] 중기의 무신이다.')
다시 한번 tokenzier 에 대한 테스트 다시 진행!
습관처럼 확인할 것!!
nlp_fill = pipeline('fill-mask', top_k=5, model=my_model, tokenizer=tokenizer)
nlp_fill('이순신은 [MASK] 중기의 무신이다.')
pipeline 을 만들고 ‘fill-mask’ 를 하고 이때, 명시애 줘야하는게 model=my_model, tokenizer=tokenizer 그리고 여기에 만약 GPU 를 이용해서 모델을 load 했다면 device 를 명시해줘야함
- device=’cuda:0’ 이게 아니고 device=0 0번 GPU 를 쓴다는 의미로 명시
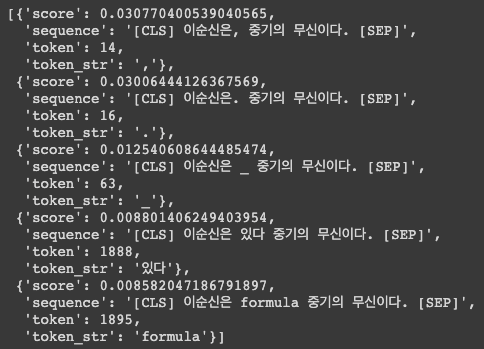
결과를 보면 답은 조선인데 스코어도 굉장히 낮고 이상한 문자가 나오게 됨
학습이 제대로 안된 케이스임
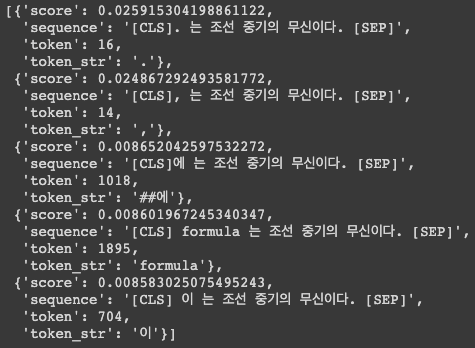
nlp_fill('[MASK]는 조선 중기의 무신이다.')
작성자
* 김성현 (bananaband657@gmail.com)
1기 멘토
김바다 (qkek983@gmail.com)
박상희 (parksanghee0103@gmail.com)
이정우 (jungwoo.l2.rs@gmail.com)
2기 멘토
박상희 (parksanghee0103@gmail.com)
이정우 (jungwoo.l2.rs@gmail.com)
이녕우 (leenw2@gmail.com)
박채훈 (qkrcogns2222@gmail.com)
댓글남기기